Tuesday, May 12, 2009

blogging indecision

i have so many drafts of blog posts saved - the drafts have the pictures of the food, but no text. i'm wavering back and forth, unable to decide whether to continue this blog or not, so i save these drafts... i'm not ready to delete them, but i just can't bring myself to keep posting.

today, i'm making a much-needed decision. no more blogging for me. in case you care, let me tell you the reasons why i've decided to quit my blog.

i'm not a writer by nature, and my posts usually read like a medical journal. after i started this blog, i began reading many, many, many other food blogs. the best ones are the ones that make me lose track of everything around me except what i'm reading - they make me laugh, or they encourage me to try something new in the kitchen, or they're educational without being dry. i suck at writing anything witty or captivating about life and food. really. i do. my posts often bore ME when i read them. the honest truth is that i don't care that i suck at writing, so i haven't spent any amount of time trying to improve my writing. i'd rather do other things in my free time.

which brings me to my next thought... is blogging really the best way to spend my free time? do i want to spend my spare time writing about cooking, or actually COOKING? the reality is that there aren't enough hours in the day to do all the things i want / need to anyway, so i pick and choose. and i choose not to write.

and anyway, i'm sure not adding anything special or unique or funny or interesting to the culinary world through this blog. all i've done in this blog is select a recipe, cook or bake it, and present my opinion of the final result. repeat. there are thousands, literally thousands, of blogs that do this same analysis of recipes. i'm not doing anything different from these other thousands of bloggers.

and this, my friends, brings me to my final issue with this blog - my camera is a piece of sh*t. nothing makes a crappier food blog than crappy pictures. if my writing is crappy, as it is, i could at least have beautiful pictures. that's what i really like looking at when i scroll through my blog anyway - the pictures, not the text. for those of you that weren't aware, it's called food porn in the foodie world. yes, i'm being serious.

so someday when i replace my sh*tty camera, maybe i'll start a flicker or picassa or something album of food porn. when i'm feeling depressed or uninspired, i'll look through my collection of food porn that i created and cheer myself right up. but i just can't do this writing thing. it's not fun like i expected it to be.

on that note, i'll leave you with this picture of tarragon chicken breasts with buttery leeks. yum!

Strawberry Rhubarb Pie - 4 stars


i realized this spring that i don't think i've ever had rhubarb. i have definitely not cooked it myself, and i have no memories of it from when i was a kid. when rhubarb harvest came around this year, i decided it was time to finally test it out.

i found a pie recipe that called for rhubarb and strawberry. it was really easy to make - i chopped the rhubarb and strawberries and mixed them together in a large bowl with cornstarch, cinnamon, and white and brown sugars. i made the crust from scratch (finally an easy task, now that i've baked enough pies in the last few years). i followed the crust recipe that came with this pie recipe rather than one i've used in the past. this one called for a combo of butter (i used vegan butter sticks) & shortening, rather than just butter. i'm always trying to find a pie crust recipe that isn't all butter because i have to hide the occasionally overpowering margarine flavor. :-)

this crust was AWESOME. i loved the addition of the shortening. it was incredibly fatty, which is a prerequisite for a rich, flaky, delicious crust. i even managed to do a lattice top. it's fairly pretty, especially considering i had NO idea what i was doing! :-)


for those of you who don't know, rhubarb looks like hot pink celery stalks. it's not quite as crunchy as celery, but instead has a denser, more rubbery texture. i sliced the rhubarb into 1/2" thick pieces. however.... when i ate the pie, those little half circle bits of rhubarb looked like kielbasa sausage. it completely grossed me out! the pie tasted wonderful, but i simply could not look at it when i ate it. i know - it's strange, but it just looked nasty to me.

i had the same excess liquid issue as the person who posted the bon appetit recipe for this pie in her blog. however.... i've never NOT had too much liquid in my fruit pies, and someday, when i figure out how to prevent this, i'll write a long post about it. :-)

all in all? five star for crust, five star for flavor, one star for the kielbasa visual. four stars overall. :-) i think i'll make a rhubarb simple syrup or a sorbet next year. anything without whole hunks of rhubarb.

Lattice-Topped Strawberry Rhubarb Pie
Bon Appetit, April 1997

Oddly enough, despite having a quarter-cup of cornstarch in it, my filling was on the wet side. However, when I came home I read all 134 comments about this recipe on Epicurious.com and found not a single mention of wetness, thus I’ve decided that it was just a freak fruit occurrence or bad measuring on my part, and not worth warning you about. Especially because this was gone in about 4.2 minutes, and I didn’t hear anyone complain.

Serves 8

For crust
3 cups all purpose flour
2 1/2 teaspoons sugar
3/4 teaspoon salt
2/3 cup chilled solid vegetable shortening, cut into pieces
1/2 cup plus 2 tablespoons (1 1/4 sticks) chilled unsalted butter, cut into pieces
10 tablespoons (about) ice water

For filling
3 1/2 cups 1/2-inch-thick slices trimmed rhubarb (1 1/2 pounds untrimmed)
1 16-ounce container strawberries, hulled, halved (about 3 1/2 cups)
1/2 cup (packed) golden brown sugar
1/2 cup sugar
1/4 cup cornstarch
1 teaspoon ground cinnamon
1/4 teaspoon salt

1 large egg yolk beaten to blend with 1 teaspoon water (for glaze)

Make crust: Combine flour, sugar and salt in processor. [Alternately, you can use a pastry cutter to make your dough, as I did.] Using on/off turns, cut in shortening and butter until coarse meal forms. Blend in enough ice water 2 tablespoons at a time to form moist clumps. Gather dough into ball; cut in half. Flatten each half into disk. Wrap separately in plastic; refrigerate until firm, about 1 hour. (Can be made 1 day ahead. Keep chilled. Let dough soften slightly at room temperature before rolling.)

Make filling: Preheat oven to 400°F. Combine first 7 ingredients in large bowl. Toss gently to blend.

Assemble Pie: Roll out 1 dough disk on floured work surface to 13-inch round. Transfer to 9-inch-diameter glass pie dish [er, I used a metal one and it was just fine]. Trim excess dough, leaving 3/4-inch overhang.

Roll out second dough disk on lightly floured surface to 13-inch round. Cut into fourteen 1/2-inch-wide strips. Spoon filling into crust. Arrange 7 dough strips atop filling, spacing evenly. Form lattice by placing remaining dough strips in opposite direction atop filling. Trim ends of dough strips even with overhang of bottom crust. Fold strip ends and overhang under, pressing to seal. Crimp edges decoratively.

Brush glaze over crust. transfer pie to baking sheet. Bake 20 minutes. Reduce oven temperature to 350°F. Bake pie until golden and filling thickens, about another 25 minutes. [The original recipe suggested a total baking time of 1 hour and 55 minutes. No joke. Mine was done in just shy of an hour.] Transfer pie to rack and cool completely.

Beef Satay with Peanut Sauce - 5 stars


this wonderful recipe came from a blog i've recently mentioned in this post - the blog is www.food-fire.com. i loved everything about it except for the peanut sauce. it didn't pack nearly enough flavor - i modified the heck out of it in order to get to a thicker, more flavorful thai-style peanut sauce.

but the beef was really something to talk about. tender, moist, and more flavorful than any satay style meat-on-a-stick that i've had before. the marinade was simple to make, and mr. katz used an excellent shortcut to give it its special satay flavor - just use red curry paste in the marinade instead of toasting spices and grinding them with kaffir lime leaves and lemongrass and other stuff.

i let the beef (i used flank steak) marinate overnight for 24 hours, then threaded it onto skewers and grilled it. i also grilled pineapple slices to have on the side.

since i live so close to uwajimaya, next time, i'll just buy a premade peanut sauce from there to save time.

i can't wait to make this again! five big fat stars.

(note: i did not soak the skewers or double skewer the meat.)

Ingredients

3 pounds boneless sirloin or flank steaks
1 cup soy sauce
1/4 cup honey
2 tablespoons Thai red curry paste
2 tablespoons lime juice (1 medium lime)
2 tablespoons peanut oil
1 tablespoon rice vinegar
1 tablespoon brown sugar
1 teaspoon dried minced garlic
1 teaspoon ground coriander

1/4 cup peanut butter
1 can (13.5 ounces) unsweetened coconut milk

Directions

Combine the soy sauce, honey, red curry paste, lime juice, peanut oil, rice vinegar, brown sugar, garlic, and coriander in a large bowl and whisk well to combine.

Trim excess fat and gristle from the beef. Cover the roast with a layer of plastic wrap or wax paper. Use the the flat side of a meat tenderizer or a heavy sauce pan to pound the meat until it it’s about 1/2 inch thick. Slice the meat against the grain into 1/4 x 3 inch strips.

Put the beef in a big Ziploc bag and add the marinade. Seal the bag and turn to coat. Marinate for at least 2 hours in the fridge, overnight is much better.

Soak skewers for at least an hour. Set your grill up for a direct cook over very high heat (about 500°F).

Pour the marinade off the beef and into a medium saucepan. Add the peanut butter and coconut milk. Stiring regularly, bring the peanut mixture to a boil. Reduce heat and simmer until the sauce has reduced by about a third. Remove peanut sauce from heat and keep warm.

Place steak on the skewers. Double skewer the meat so that it will be easier to flip. Grill for 2 to 3 minutes on each side, or until just cooked through. You want to crispy on the outside and medium on the inside. Serve hot with the peanut sauce.

Big Ass Mushroom Burger - 5 stars


this looks amazing. and i remember it well - it WAS amazing. i didn't really do anything to the beef - just mixed some seasoning salt and pepper into it and formed it into big patties. buy high quality ground beef or ground sirloin, and that is all you will ever need to do. i put a thumb indentation in the center of the patties and tossed them on the grill, preheated to medium high.

note: when grilling burgers, never, ever press down on them with the spatula. the precious meaty juices run out, leaving a dried out patty behind. yuck. instead, indent the center of the raw patties with your thumb when you form them. this will prevent them from turning into the shape of a baseball when they're on the grill.

while the patties were grilling, i sauteed a bunch of sliced crimini mushrooms in some olive oil with garlic and pepper. i sliced up some fresh tomato and onion, tossed the buns on the grill, and flipped the burgers.

when the burgers were close to done, i threw some soy pepperjack cheese on mine, and some ... gouda? regular jack? i can't remember! some sort of non-soy cheese went on tony's. :-)

i assembled them on their toasted buns, and somehow, we managed to eat them in spite of their height. yum!

Cornish Game Hens + Mashed Baby Reds - 5 stars


it has been many, many years since i've eaten baby chickies, and these tasty little guys were on sale at some point. my mom thought we'd enjoy them, so she purchased a package for us. a couple months after i got them, i pulled them out of the freezer and thawed them in the fridge for a few days.

when i took these little guys out of their bags, there was SO MUCH raw chickie juice - much more so than a regular uncooked chicken. ugh! fortunately, i had opened the bags in the sink, so i didn't make too much of a mess.

i found some fancy baby chickie recipes that i tried to decide among, but in the end i was too lazy on the day i cooked my chickies to buy all the ingredients and put the work into it. instead, after rinsing and drying them thoroughly with papertowels, i made a rub out of lemon zest, minced garlic & shallots, salt and pepper and a bit of olive oil. i stuffed it underneath the skin and in the cavity of the little chickie. this part was easy, but the trussing part? not so easy. i don't normally truss my chickens when i roast them whole, so i've never really done it. i think i ended up figuring it out, but you can be the judge:


so... i roasted them for approximately fifty minutes or so at 425f til they were done. i made a big bowl of mashed baby red potatoes and dug in. YUMMY! i believe baby chickies are fattier than regular chickens, so the flavor was great! the zesty rub was perfect, the skin was crisp, the meat juicy. five stars.

Pineapple Upside-Down Cake - 5 stars


this was the first upside-down cake i've ever made, and it was SO good! wow. it had a really unique (but good!) flavor to it, which was primarily from the ground cardamom that went into the batter. mmmmm.

i made my cake in a cast iron pan, starting on the stove top, finishing in the oven. the first step was to melt butter with brown sugar in the cast iron pan, but.... i didn't have any brown sugar! i did some very quick internet research while the butter was melting, and found out that i could mix some molasses with regular sugar to create brown sugar. there are different ratios depending on whether you are trying to get to light or dark brown sugar or somewhere in the middle. i, of course, did the wrong ratio and was terrified that it'd ruin my cake.

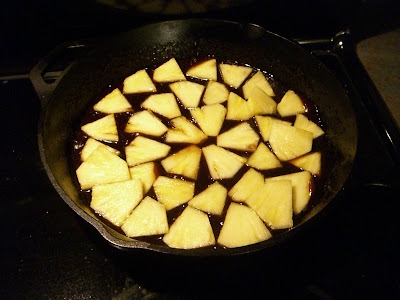
after i melted the butter and caramelized the screwed up brown sugar, i removed the pan from the heat and arranged the pineapple slices in the bottom of the pan. i didn't read the recipe correctly here either, because i was supposed to layer them so that the bottom of one slice overlapped the top of another. oops. the only thing this affected was how the finished cake looked.


i let the pan cool while i prepared the batter. it was easy to assemble, recipe is below. it's from gourmet magazine - i found the recipe on their website. it did not include the baking temperature for the cake though! uh, that's an important piece of information! i left a comment for gourmet though, and it looks like they've since updated the recipe to include the temp - 350f. :-)

i used just shy of 3 teaspoons of cardamom in the batter, and i thought it was perfect. and as far as i could tell, the parts of the recipe that i screwed up didn't affect the finished product at all. it appears that this is quite a forgiving recipe. :-)

Pineapple Upside-Down Cake

Serves 8
  • Active time:30 min
  • Start to finish:1 1/2 hr
ADAPTED FROM RICK ELLIS
February 2000

For topping

  • 1/2 medium pineapple, peeled, quartered lengthwise, and cored
  • 3/4 stick unsalted butter
  • 3/4 cup packed light brown sugar

For batter

  • 1 1/2 cups all-purpose flour
  • 2 to 3 teaspoons ground cardamom (see cooks' notes)
  • 2 teaspoons baking powder
  • 1/4 teaspoon salt
  • 3/4 stick unsalted butter, softened
  • 1 cup granulated sugar
  • 2 large eggs
  • 1 teaspoon vanilla
  • 1 tablespoon dark rum
  • 1/2 cup unsweetened pineapple juice
  • 2 tablespoons dark rum for sprinkling over cake
  • Special equipment:

    a well-seasoned 10-inch cast-iron skillet

Make topping:

  • Cut pineapple crosswise into 3/8-inch-thick pieces. Melt butter in skillet. Add brown sugar and simmer over moderate heat, stirring, 4 minutes. Remove from heat. Arrange pineapple on top of sugar mixture in concentric circles, overlapping pieces slightly.

Make batter:

  • Preheat oven to 350°F.
  • Sift together flour, cardamom, baking powder, and salt. Beat butter in a large bowl with an electric mixer until light and fluffy, then gradually beat in granulated sugar. Add eggs, 1 at a time, beating well after each addition. Beat in vanilla and rum. Add half of flour mixture and beat on low speed just until blended. Beat in pineapple juice, then add remaining flour mixture, beating just until blended. (Batter may appear slightly curdled.)
  • Spoon batter over pineapple topping and spread evenly. Bake cake in middle of oven until golden and a tester comes out clean, about 45 minutes. Let cake stand in skillet 5 minutes. Invert a plate over skillet and invert cake onto plate (keeping plate and skillet firmly pressed together). Replace any pineapple stuck to bottom of skillet. Sprinkle rum over cake and cool on plate on a rack.
  • Serve cake just warm or at room temperature.
Cooks’ notes:
  • Some of the food editors found 3 teaspoons of cardamom to be too much, but others loved the intense flavor.
  • Cake may be made 1 day ahead and chilled, covered. Bring to room temperature before serving.
Courtesy of gourmet.com

Friday, April 10, 2009

Hoisin Lamb Stirfry - 5 stars


this fantastic stirfry was also out of The Splendid Table's How to Eat Supper. seriously, that cookbook is amazing. the recipes are perfectly written, listing accurate prep & cook times, serving sizes, and whether you must serve the dish right away, or if it will make good leftovers, or both. the ingredients for the dishes are listed in the order that they're added to the dish, and the step-by-step instructions are clear without being excessively wordy. there are notes in the margins that give you hints about the most important part(s) of the recipes, or areas that you can cheat in, or info about the ingredients.

however, i'll stop touting the book now, and write about this phenomenal lamb stirfry. i've never been a big lamb fan - it's always been a bit too... gamey? for my tastes. gamey isn't the right word, but it's the best way that i can come up with to describe the aspect of lamb that i've never cared for. so i researched this today, and i discovered that the sharp "gamey" flavor is caused by lanolin, which is a substance that sheep naturally secrete. the lanolin acts as a waterproofing agent and also has anti-fungal and antibacterial properties to protect the sheep. some breeds of sheep (there is one called Katahdin) have such a delicate coat that requires little shearing, and they produce very, very little of this substance called lanolin. if the sheep is raised well, slaughtered before the age of 1 and the fell is properly removed, or if it is a breed with this special low-lanolin coat, it will have a delicate taste and none of this gamey-ness that i've experienced.

after doing this research, my question is - did i finally happen to buy a cut of lamb better than any i've had before when i made this dish, or have i just never had lamb prepared very well? was this the recipe that i needed to find in order to fall in love with lamb? i plan to make lamb again this week, so i'll find out then!

one note about this recipe - i used fresh water chestnuts, and they were nasty! i've never been a fan of water chestnuts, and using fresh ones didn't change that. next time i make this, i'm skipping the water chestnuts altogether.

Stir-Fry of Hoisin Lamb with Cashews and Snow Peas
Serves 3 to 4
20 minutes prep time, 6 minutes stove time
Serve and eat immediately

The Lamb:
1 to 1 1/4 lb tender lamb (lamb steaks are ideal), trimmed of fat and connective tissue, and cut into 1/2-inch by 1-inch chucks.
1 teaspoon Chinese five-spice powder
1/4 to 1/2 teaspoon red pepper flakes
1/2 teaspoon salt
1 tablespoon cornstarch
1 tablespoon dry red or white wine

Vegetables:
One 1-inch piece fresh peeled ginger, minced
1 garlic clove, minced
1/4 to 1/2 teaspoon salt
1 medium red onion, cut into 1-inch dice
1/2 cup water chestnuts, quartered or sliced
1 handful snow pea pods, trimmed

Sauce:
3 tablespoons hoisin sauce
1 tablespoon soy sauce
1 tablespoon rice vinegar
2 tablespoons rice wine or dry white wine

Stir-fry:
3 tablespoons cold-pressed vegetable oil
1/2 cup salted cashews, roughly broken

1. Measure out, cut and group together each section's ingredients: In a bowl, toss the lamb with its seasonings, including the cornstarch and wine, so it is thoroughly coated. Have the ginger and garlic ready to go into the wok, and have the onion, water chestnuts and snow peas piled on a piece of paper towel, ready to go. In a small bowl, blend the sauce ingredients together. With this lineup, the stir-fry will easily come together in a few minutes.
2. Set a 14- to 16-inch wok or a straight-sided 12-inch saute pan over high heat. When it is hot, swirl in 1 1/2 tablespoons of the vegetable oil. Add the lamb and stir-fry for 90 seconds. Spread the lamb out as you cook it, so all its sides sear. Immediately remove the lamb to a clean bowl. Wipe out the wok with paper towels.
3. Heat the wok again over high heat. Swirl in the remaining 1 1/2 tablespoons oil. Stir in the ginger and garlic, and stir until fragrant (maybe 5 seconds), sprinkling with the salt. Immediately add the vegetables. Stir-fry for 1 1/2 to 2 minutes. Add the sauce mixture, and continue stir-frying for another 90 seconds.
4. Turn the lamb into the wok, and stir-fry for about 10 seconds to heat it through. Stir in the cashews, and turn the mixture into a serving bowl. Serve immediately.